

How to Make a Three-Pendulum Rotary Harmonograph
Karl Sims
Karl Sims
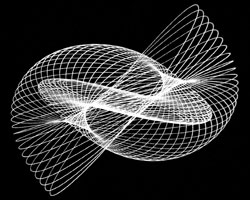
A harmonograph is a mechanical device that uses swinging pendulums to draw pictures, believed to be originally invented in 1844 by Scottish mathematician Hugh Blackburn. This 3-pendulum rotary type of harmonograph gives a wide variety of pleasant results, and is fairly easy to build once you've settled on a design and have acquired the appropriate materials and tools. This is a great project to do with kids and can result in endless experiments creating new types of geometric designs.
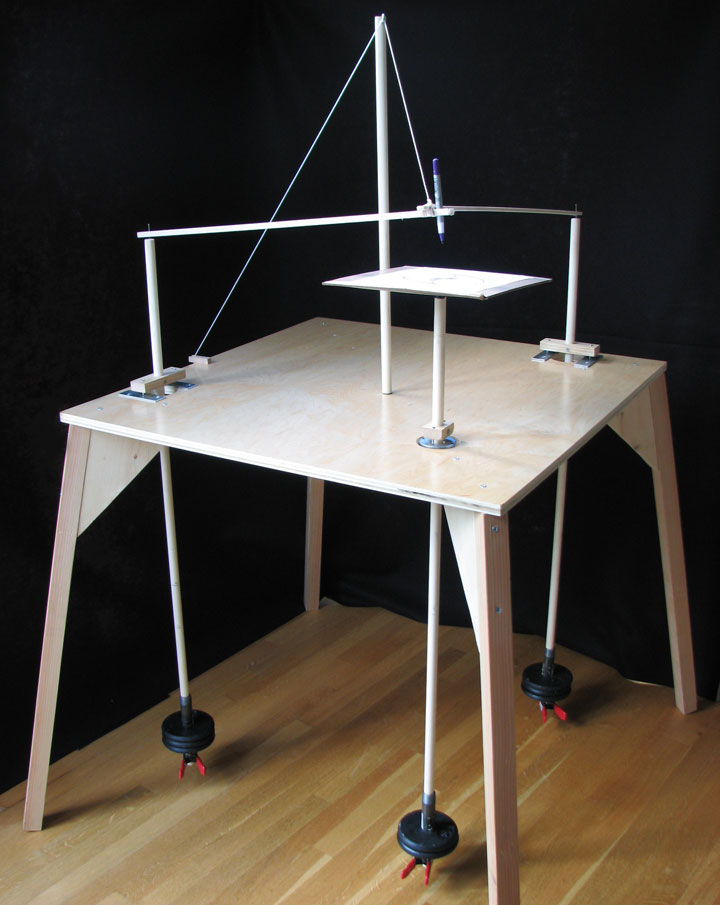
Two lateral pendulums swing back and forth at right angles to each
other with arms connecting to a pen. One moves the pen from side to
side, and the second moves it from front to back on the paper. A
third "rotary" pendulum moves the paper by swinging on any axis or in
circular motions, while the pen is drawing on it. The combined
motions of all three pendulums generate the resulting drawing.
Table
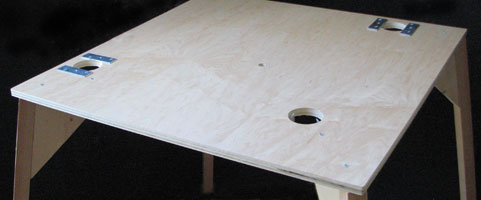
Start by building a sturdy table. This table top is a 3'x3' square of 3/4" thick plywood. The legs are 1½" x 1½" square and about 37" long, with triangular braces cut from 1½" x 8"x 12" wooden pieces. The legs are splayed out slightly to give the table strength, and to allow the rotary pendulum to swing without hitting a leg. Tip: screw and/or glue the braces to the legs first, and then cut their tops together at a slight angle with a table or circular saw. Adjust the leg lengths to give a table-top height of about 37".
Note: if you want to be able to fit the table through doorways without taking off the legs, you might need slightly shorter legs and pendulums.
|
Drill 3 holes of 3" diameter through the table surface for the pendulums to hang through. The hole for the rotary pendulum should be centered in a corner about 8" from each side just clear of the leg brace underneath. The other two holes should be aligned near the opposite edges, about 8" from the common side, and 3" from the other. You'll need a special large circular drill bit for this. Alternatively you can first drill a smaller hole, and then cut a wider opening with a jigsaw.
Plates to support pendulums
Mount two metal plates (about 1¼" x 4") on the sides of the two lateral pendulum holes, and drill a small indentation in the center of each plate. Tip: first start the indentation in the metal plate with a small drill bit (such as 1/8") and then continue with a larger bit (such as 1/4"). Be careful not to drill all the way through. Tip: unless you have a good drill press, it may be easier to position the indentations of the plates on the table after you create the fulcrum blocks with protruding screws below, because it can be harder to accurately position the screws in the blocks later to align with the indentations.
The pendulum shafts are made from 4' long 3/4" diameter wooden dowels. Hardwood blocks, 3/4" x 1½" oak, are used as a fulcrums so the pendulums can rest and rock on the table with minimal friction. For the two lateral pendulums, use 5" long blocks, and for the rotary pendulum, use a 2¼" long block. Drill a 3/4" hole through the center of each block, and screw 1¼" #10 screws through each end. The tips of the screws will rest in the indentations of the metal plates on the table to keep them in place while rocking. Insert a dowel through the 3/4" hole in each fulcrum block. Glue and/or screw them such that the screw tips are 12" from the top end of the dowel and facing downwards. The pendulum should hang down 36" below the top surface of the table with about a 1" clearance from the floor.
| ||||
The rotary pendulum needs a gimbal mechanism that allows it to swing in any direction. This is made from a large metal washer with 2½" outer and 1" inner diameter. The washer rests on screw tips protruding from under the table, and then the pendulum rests on the washer. Drill pairs of indentations into the washer on each side, off 90 degrees between the sides, to allow rocking on two perpendicular axes.
| ||||
| ||||
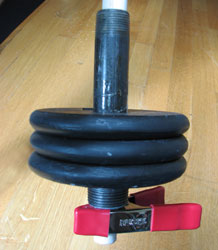
2½ lb lifting weights from a sporting goods store work well, but typically have a 1" interior hole. You can stack several weights and slide them together onto the 3/4" pendulum dowel by using a 5" long 3/4" metal pipe nipple, with a 3/4" to 1" bushing screwed onto the lower end. A 1" steel clamp attached to the dowel fixes the weights from sliding off, and allows easy adjustment of the weight's height to give different swinging frequencies.
| ||||
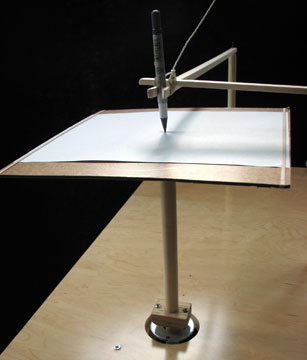
Cut about 1" off the top of the rotary pendulum dowel, so it is slightly lower than the other two. Then mount an 11"x11" square of thin 1/8" board to the top of this pendulum, using a small oak block glued to it for support, with a 3/4" hole for the dowel. Wrap some tape around the top of the dowel to get a tight fit, or just glue it on. Use two rubber bands, or some clips, to hold the paper in place on the platform. If the paper slips on the platform when in use, spray a thin layer of temporary adhesive on the platform to make it slightly sticky.
| ||||
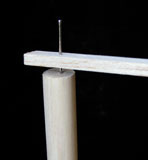
Connect a 30" long balsa stick to the top of each lateral pendulum using a thin nail. Bend the nail back and forth a little in the balsa to allow the the arm to rotate smoothly and move up and down slightly. The nail hole will slowly loosen further during use. To make a simple pen-holder, drill a 1/2" hole on the end of one arm, and cut about 4" down the center of the arm to make a clothes-pin like device. Alternatively, just glue a real clothes-pin to the end of one of the arms. Pictures of both versions are shown. Finally attach the two arms together with a doubled-over rubber band as shown. Note that if you plan to use your harmonograph regularly, such as in a museum setting, a more robust solution for these arms that won't wear as quickly might be necessary. | ||||
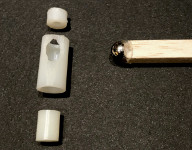
An alternate version of the arm-pendulum connection is shown to the right that uses a magnetic ball joint instead of the simple nail method above. Glue one 3/8" spherical magnet to the end of the arm (making sure the N/S alignment is horizontal by connecting a second magnet). File a hole in the side of a nylon cylinder (1" height, 1/2" outer and 3/8" inner diameter) and use smaller cylinders (3/8" outer diameter) to hold another magnet inside that can rotate freely. Then glue the cylinder to the top of the pendulum.
| ||||
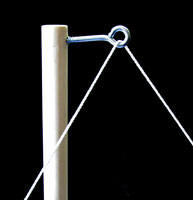
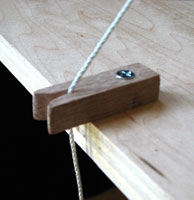
It is convenient to be able to raise and lower the pen gently without disturbing the motion of the pendulums. To do this, insert a 30" pole into a hole near the center of the table, just far enough from the paper platform that it won't be hit by it (about 12" from the rotary pendulum hole). Attach an oak block under the table for a deeper hole and better support. Tie a string to the balsa arms where they are connected together, lead it through a screw-eye on top of the pole, and back down to a small jam cleat or groove where it can hold the pen in place above the paper until you are ready to lower it.
|
Experiment with pens and markers of various types and colors. Generally wide pens or thin markers seem to work best. Here are some I've had good luck with so far:
Materials list
Lumber:
Weight Height
Adjust a pendulum's weight height to change its swinging frequency. The frequency of a pendulum varies with the inverse of the square root of its length, so to swing twice as fast, the length between the fulcrum and its center-of-mass would need to be 1/4 of the original length (which may not be practical with this harmonograph). For a 3:2 or 4:3 frequency increase, one of the weights would be raised around 19" or 15" respectively, although you should probably do some timing tests to find and mark these heights experimentally.
Weight Amount
Add more weight to a pendulum to counteract friction and make the swinging last longer. I've found that 5 lb (2 x 2½) on the rotary pendulum, and 7½ lb (3 x 2½) on the other two works fairly well. Note that adding more weight does not generally change the frequency of the pendulum.
Phase and Amplitude
Each time you swing the pendulums to make a new drawing, the relative phases and amplitudes of each pendulum will vary. Try some where the rotary pendulum and the lateral pendulums are initially making circles in the same, or in opposite directions. Try some where the lateral pendulums are initially swinging in phase to make a diagonal line.
Two-pendulum results
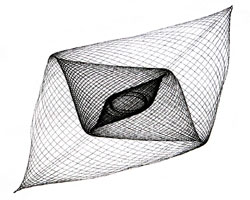
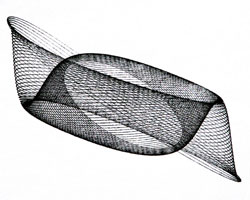
To simplify things, you can lock down the rotary pendulum by unclipping that weight so it rests on the floor and prevents the paper platform from swinging at all. Attach the other weights at their lowest position to start, since a slower pen speed tends to give smoother lines. If the two other pendulums swing in unison at the same frequency you will get simple patterns of circles, ellipses, or lines. If their frequencies are slightly different, the pattern will slowly change from circles to lines and back again as it decays, which will give eye-like designs. When the frequencies are very different, you may get chaotic looking results. However, if you find a position that is near a "harmonic" ratio of frequencies such as 3:2 or 4:3 you can get pleasant Lissajous figures, figure eights, or fish-like shapes.


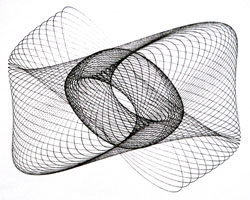
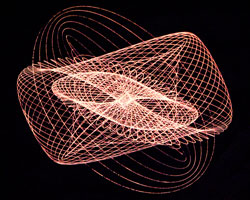
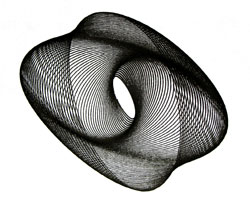
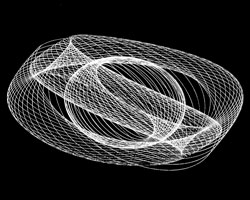
The effect of the 3rd rotary pendulum increases the variety of possible results. Some of the best designs occur when the three pendulums all swing at similar but slightly different frequencies, with the rotary pendulum swinging around in a circular motion. Note that the mass of the paper platform on top of the rotary pendulum causes it to swing at a slightly slower frequency when all weights are at their lowest position, so you would raise that one slightly if you want it to match the frequency of the other two.


Various star-shaped designs can be made by raising weights on both the lateral pendulums, or just the rotary pendulum, to give harmonic frequency ratios. A 3:2 ratio often results in 5-pointed stars and a 4:3 ratio tends to give 7-pointed star shapes.


Achieving higher frequency ratios, such as 2:1, 3:1, 4:1 etc. can be difficult with this type of harmonograph, because a quickly swinging pendulum with its weights way up tends to slow down too soon. It may be preferable to add some weights on top of one or more pendulums above the fulcrum which will decrease the frequency, rather than raising weights to increase frequency.
Further Reading
Make Magazine featured a version of these instructions including some larger images.
Harmonograph: A Visual Guide to the Mathematics of Music by Anthony Ashton (Wooden Books) is a great little book with harmonograph examples and explanation including the connection with musical harmonics.
Things
to Make, a 1920's book by Archibald Williams has a chapter on
several harmonographs including the Twin Elliptic Pendulum
harmonograph by Goold, and another by Benham, which should be more
successful at obtaining higher frequency ratios.
Back to other work by Karl Sims
©2009, Karl Sims, All rights reserved.